Beginning with the Basics for Colored Pencil Portraits

BlogPostBanner.jpg

Stop Beginning At The End!

Portraits are some of the most striking pieces in colored pencil. When done well, the realism is breathtaking!

I can’t count the number of times I’ve heard someone say, “Is that colored pencil? But the people look so real! I didn’t know colored pencil could do that.”

Many artists (myself included) see colored pencil portraits and feel inspired to draw one themselves. They race off to the bookstore or start searching YouTube for a great tutorial, then wonder why their portraits fall short.

Why don’t my colored pencil portraits look realistic? Where did I go wrong? Can I even learn how to do this? What am I missing?

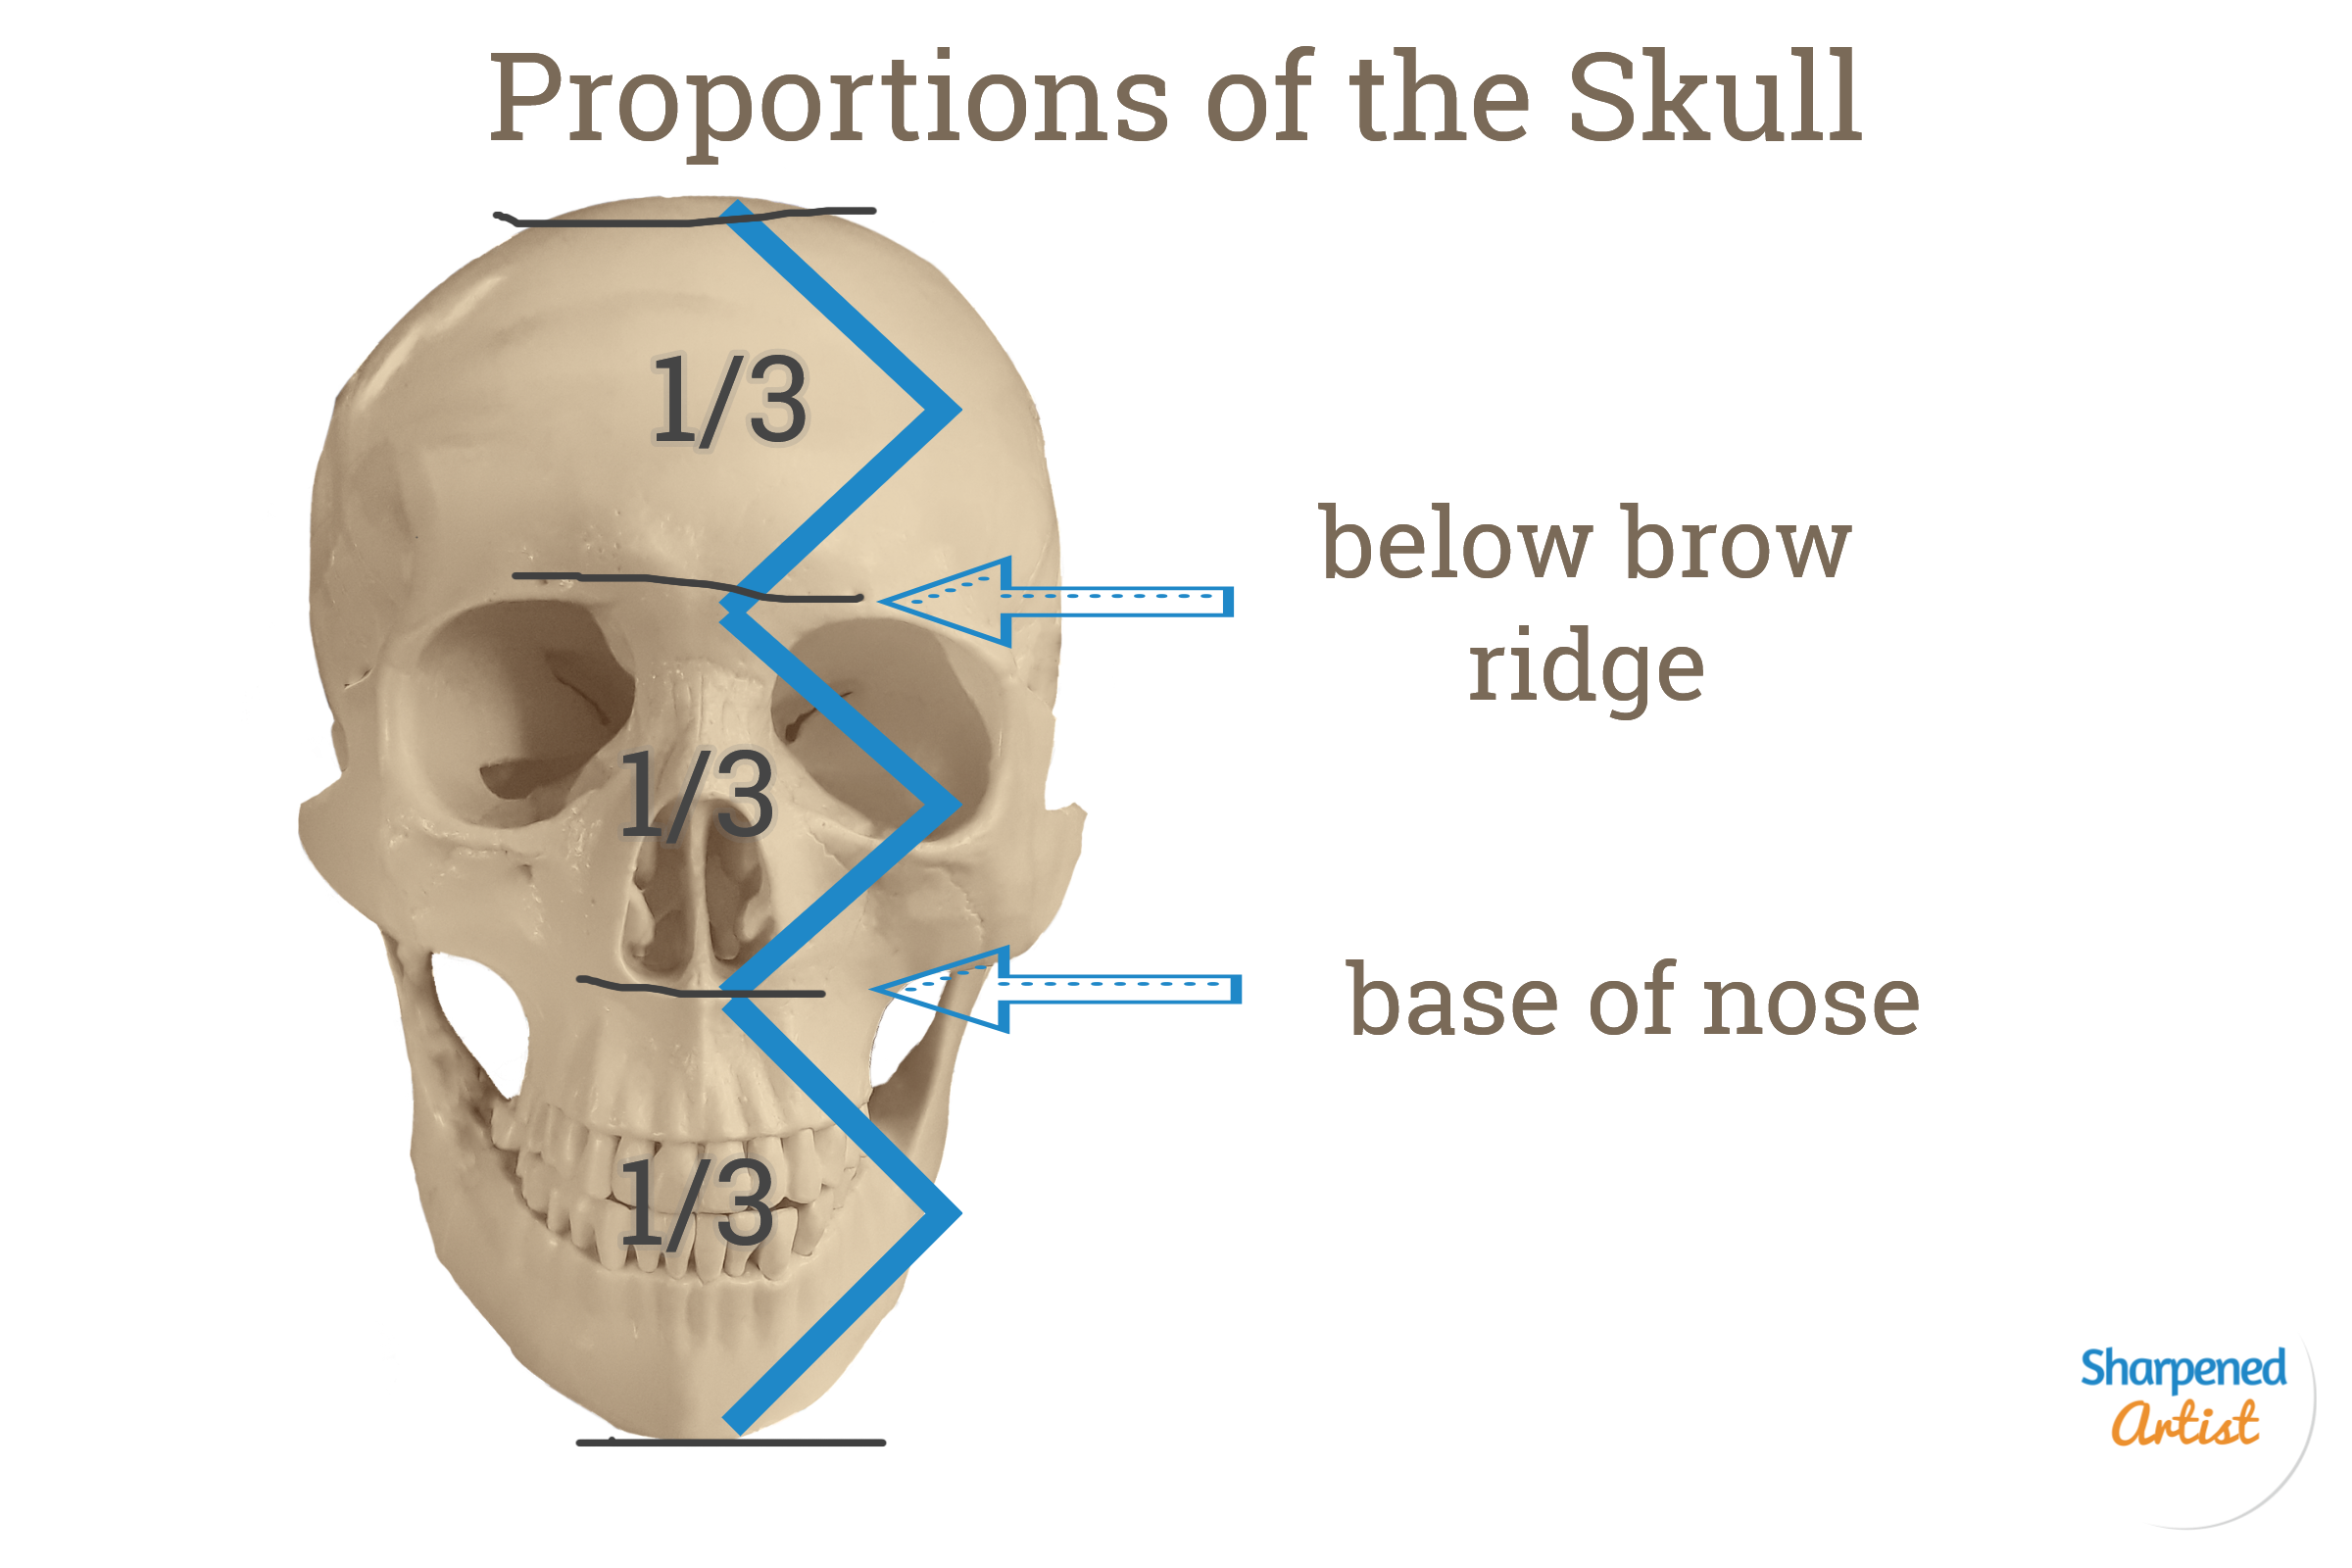
That last question is the most important! Most portrait tutorials are missing some of the most fundamental information needed to draw a truly realistic portrait: anatomy of the skull and face, angle and positioning variations, ideal proportions, and more.

It took me an embarrassingly long time to figure this out for myself.

But once I headed back to the beginning and did some of the necessary pre-work, I became comfortable with portraiture and began loving the results. My portraits started to come alive the way I had always wanted plus I was way more confident throughout my drawing process. I actually enjoyed the process!

That’s what I want for YOU. And, yes, it IS possible for you!

Welcome to the Portrait Prep Drawing Series!

In this series of lessons, I want to lead you through the all-important fundamental information. If you’re anything like me, you might think you can skip all of this stuff.

How to draw a line?? Anatomy? Head construction? Sounds like a waste of time-- I’ll just study photography and find great reference photos instead.

Not so fast, my friend! Learn from my mistakes, and begin at the beginning.

To create an appealing house, it’s essential to first build the frame before putting up the walls, painting, and decorating, right? Portraits are no different. To create a realistic portrait, you have to understand the underlying structure of the head before rendering the skin and hair and other features.

Follow along through the next few posts as I share with you some of the information I wish I’d had when I started drawing portraits. By the time we’re through, I want you to be so familiar with every possibility (face positioning, angles, and foreshortening of the features) that when you finally pick up your colored pencil, you will be ready to paint that final layer on a well-constructed head.

This article is the introduction to the Portrait Prep Drawing Series! Here’s the link to the first installment in this drawing series!

Want an even deeper look at drawing portraits? Sign up for my FREE Portrait Prep Drawing Course!  

Portrait Prep is a video course inside the Sharpened Artist Academy. Together we’ll walk through the core fundamentals of drawing incredible portraits.

Sound good? Click here to signup


What are your biggest challenges when drawing colored pencil portraits? Share in the comments below!


PORTRAIT PREP SERIES: Lesson 2 The Skull, Muscle and Skin

PPC-Lesson2.0.jpg


Welcome back to Portrait Prep! (If you missed the previous lessons, you can find them here: IntroLesson 1, Lesson 1.2).


In this section, we're going to talk about the skull, the facial muscles, and the skin. These parts work together to form what we see as a complete face, so it’s important to get to know what’s going on under the surface to know how each part affects what we see.

The Skull

If you're using graphite and you're new to drawing the skull, remember to be patient with yourself and take it slow. Think more about the proportions of each of the areas you're drawing.

I typically start any drawing in the top left corner, move downward through the drawing, and end at the bottom of my subject and over to the right. I'm right-handed and I don't want to impair my ability to see what I've already drawn or smudge anything, so this method is effective for me.

To begin, draw a curve on the top right side to represent the major side plane of the skull in the cranium area. Next, make the same identical mark on the left side.

Once you have those two marks down pretty accurately, connect them at the top by another curved line which will serve as the top of the head.

The rest of the skull should be proportionate to the top part of the head.  Ultimately there is no right or wrong way to draw the skull, but everything needs to be relative in proportion to what you've drawn prior to your current marks.  If you find that your proportions are becoming out of scale to the rest of the drawing, simply erase and start that portion over.  (I’d like you to attempt to draw it just by eyeballing the proportions for now. In a later lesson, we will go over the measurements of the skull to make it even more proportionate.)

Pay careful attention to the zygomatic area in the frontal view and make sure that you don't overemphasize it. You might be tempted to make it stick out further than it already does, so be careful!  

Another cautionary area when drawing the skull is making the orbitals too circular and too close together.

You may also discover that you have a tendency to elongate the face area and make it seem much more vertical than it really is.

But remember: this part of the course is intended to be a series of exercises. You’re not creating fine art renderings to be entered into a contest or gallery.  This is simply sketching with a goal of improvement and training your eyes to recognize accuracy. 

Check out the reference that I've provided here as a guide for creating your skull drawing.

Skull Proportions.png

You can also look at the quick sketch that I've done in the picture below.

It doesn't need to be elaborate at this point. Just have a basic understanding of where these anatomical landmarks are.

It doesn't need to be elaborate at this point. Just have a basic understanding of where these anatomical landmarks are.

(Portrait Prep Course students - you’ll refer to the "Drawing the Skull" video that was emailed to you.)

Muscles of the Face and Head

Now that we have a bit more background about the skull, let's move on to the muscles of the face and head.

If you're overly ambitious and have a lot of time on your hands, this would be an excellent time to learn all the muscles names that make up the face and head. If you’re like me and don’t have that much time to invest, don’t sweat it. All you really need is an understanding of where they are and how they relate to one another. 

There are a couple of areas that have some interesting formations in the face that you will want to notice, outlined in the pictures below. There are some rounded muscles in the eyes, for example. The mouth areas also have some curved types of muscles that affect the way the skin appears in the nose and in the forehead. And then there are some muscles that overlap each other and come together in separate places of the face: the corners of the mouth and some areas in the neck. 

Use the reference below to create a line drawing of the muscles of the head. This will help you gain a better grasp of where these muscles are and how they're positioned in the face. 

Original image can be found at: https://en.wikipedia.org/wiki/Facial_muscles

Original image can be found at: https://en.wikipedia.org/wiki/Facial_muscles


Skin

The last part of this section is a very brief look at the outer layer of the skin. That layer is affected by certain landmark areas in relationship to the skull and muscles underneath.


Some of the most important areas to study skin positioning are the eyes, the mouth, and the nose.


The eyes:

The eyeball itself is positioned higher up inside the eye socket. The eyelid actually closes over the upper part of the eye where the top lid will meet the lower lid and produce most of the movement. This is the reason why there are often shadows on the lower portion of the eyeball (the sclera). 

The mouth:

The mouth is more of a cylinder shape and is heavily influenced by the muscles that surround it immediately under the surface.  The muscles get their overall contour from the skull (particularly the teeth, maxilla, and glabella).

The nose:

The nose has a curved area that covers the cartilage.  While the length and side planes of the nose may not seem all that difficult to draw, the underlying structure and make-up of its anatomy is anything but simple.

In conclusion, I hope that this lesson has helped you become more aware of the underlying anatomy of the head and face. When we start to draw a more serious rendering with colored pencil (or another medium of your choice), this knowledge should come back to you and inform your decisions.

We want the knowledge to be sub-conscious and automatic so that we don’t have to think about it when we draw.  We are working towards understanding WHAT we draw so that we can draw what we know.  So we're trying to get past drawing what we see. 

Have a question or discussion point about this info? Sound off in the comments!