drawing

10 Creative Ideas For New Direction In The New Year

Happy New Year!

It's a brand new year filled with new possibilities for your art.

I wanted to share a few words of encouragement as we head into this new year.

What Can You Do This Year?

If you're as enthused about the possibilities of this fresh year as I am, then I have a proposition for you...

Do something to stretch yourself in some new way.

Need some help?

Here are a few things to consider to get you started: 

  1. If you've been putting off establishing a daily drawing practice, now might be the time. If that still sounds overwhelming, then just grab a very small sketchbook and draw for just 5 minutes every single day!

  2. Have you been wanting to expand your mixed-media knowledge? Perhaps you're a little hesitant about combining mediums with colored pencil. Simply decide to try it this year and go ahead do it!

  3. Why not make this the year to pursue your ambition of creating a cohesive body of work? To get started, set a goal for how many art pieces you want to complete by January 2023. Then figure out the drawing you'll do for the first month, first quarter, and so on. Don't over-complicate it.

  4. Maybe It's time to go local and check out your area's art gallery. It's only a small step from viewing to asking the gallery whether your artwork may be exhibited.

  5. Perhaps you've been wanting some accountability to staying on track with your continued learning and development. It's not a sign of weakness- It's a wise person that seeks counsel.

  6. It's possible that it's time to write and submit an article for publication in a magazine or website. If that's you, then here's the plan: Make the job of the editor extremely easy. Don't be pushy. Just share the article idea with them first. If there's interest, then supply everything they ask for before the deadline you're given.

  7. Maybe it's time for you to start filming your work for a YouTube channel, a course, or a live zoom workshop. If you've got a newish cell phone, that's enough to get started!

  8. If you've been drawing the same thing for a while, maybe it's time to experiment. Perhaps it's time to try something new if you've been doing portraits of just infants. If you've mainly drawn still life subjects, consider experimenting with a landscape or two. There are limitless possibilities for what may be fresh for you.

  9. Change the size of your drawings. If you've been drawing mostly a 8x10 scale, then consider drawing a 12x14 size. Or, if you've been drawing pieces that are longer than 30 inches, consider doing a 5x7 from time to time. You may be pleasantly startled by what opens up to you creatively by making this one change.

  10. Maybe it's time to start a website for displaying your work or updating the one you already have. It's an excellent method to display your work and, if you've been looking for commissions, there is no better point of contact than this.

The point is, there are no bounds to what you can do this year with your art hobby or career. 

All you need is some ambition and a willingness to push yourself a little bit further than you have before. 

Just pick 1 or 2 items that you have agency over. I know you can do it!

One final thing.. 

I know it isn’t always easy to make changes, but it’s worth it in the end. 

Going in a new (or even slightly new) direction can open up so many new options that you don't have until you make that change. 

So, What changes do you want to set in motion in the year 2022 for your art?

What will you do to make those changes happen?

I'm eager to hear about your art plans - and even more excited to see how those ideas take shape!
Beginning with the Basics for Colored Pencil Portraits

BlogPostBanner.jpg

Stop Beginning At The End!

Portraits are some of the most striking pieces in colored pencil. When done well, the realism is breathtaking!

I can’t count the number of times I’ve heard someone say, “Is that colored pencil? But the people look so real! I didn’t know colored pencil could do that.”

Many artists (myself included) see colored pencil portraits and feel inspired to draw one themselves. They race off to the bookstore or start searching YouTube for a great tutorial, then wonder why their portraits fall short.

Why don’t my colored pencil portraits look realistic? Where did I go wrong? Can I even learn how to do this? What am I missing?

That last question is the most important! Most portrait tutorials are missing some of the most fundamental information needed to draw a truly realistic portrait: anatomy of the skull and face, angle and positioning variations, ideal proportions, and more.

It took me an embarrassingly long time to figure this out for myself.

But once I headed back to the beginning and did some of the necessary pre-work, I became comfortable with portraiture and began loving the results. My portraits started to come alive the way I had always wanted plus I was way more confident throughout my drawing process. I actually enjoyed the process!

That’s what I want for YOU. And, yes, it IS possible for you!

Welcome to the Portrait Prep Drawing Series!

In this series of lessons, I want to lead you through the all-important fundamental information. If you’re anything like me, you might think you can skip all of this stuff.

How to draw a line?? Anatomy? Head construction? Sounds like a waste of time-- I’ll just study photography and find great reference photos instead.

Not so fast, my friend! Learn from my mistakes, and begin at the beginning.

To create an appealing house, it’s essential to first build the frame before putting up the walls, painting, and decorating, right? Portraits are no different. To create a realistic portrait, you have to understand the underlying structure of the head before rendering the skin and hair and other features.

Follow along through the next few posts as I share with you some of the information I wish I’d had when I started drawing portraits. By the time we’re through, I want you to be so familiar with every possibility (face positioning, angles, and foreshortening of the features) that when you finally pick up your colored pencil, you will be ready to paint that final layer on a well-constructed head.

This article is the introduction to the Portrait Prep Drawing Series! Here’s the link to the first installment in this drawing series!

Want an even deeper look at drawing portraits? Sign up for my FREE Portrait Prep Drawing Course!  

Portrait Prep is a video course inside the Sharpened Artist Academy. Together we’ll walk through the core fundamentals of drawing incredible portraits.

Sound good? Click here to signup


What are your biggest challenges when drawing colored pencil portraits? Share in the comments below!


​​​​​​​Are You Drawing Backgrounds That Don’t Work?

animation.gif

Let’s have a little chat about backgrounds, shall we?

Most new artists feel the need to have a background in their drawing. That’s all well and good. 

An effective background can:

  • Add depth and interest to your subject.

  • Create context and keep the viewer engaged longer.

  • Help establish the focal point and allow the subject to stand out.

But an ineffective background can actually compete with your subject for attention. (Not good.)

Let me use a few photographs to explain what I mean.

small - model-807555_960_720.jpg

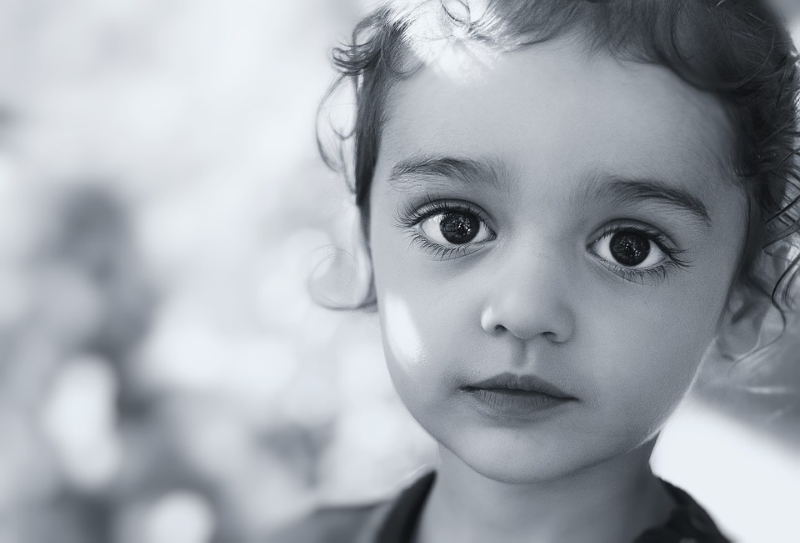
When you look at this photo of a little girl, your gaze is automatically to her eyes-- that’s the focal point. The dark irises are starkly contrasted to the white of the eyes (sclera).

What do you notice about the background?

It’s just a few blurry shadows and barely there at all. In fact, you probably didn’t notice it until I asked about it. That’s the sign of a background done right.

Can you imagine what would happen to the impact of this photo if it had one of those “use all the circles” backgrounds I’ve been seeing lately?

Let me show you:

imposed background - pexels-photo-220071.jpg

(You’ll have to pardon my quick photo edit, but I think you get the idea.)

Now instead of a realistic portrait, we have some sort of new-age space photo. The circles are incredibly distracting and the eyes no longer have our full attention.  Why?  Because the background has just as much contrast as the eyes do.

The entire tone of the portrait has been altered--and not for the better.

Here’s another photo example with an ineffective background:

small - Girl against rocks.jpg

Notice that the level of detail in the background is similar to the level of detail in the subject. The colors are similar across the board, too.

We see similar values in the skin, hair, and face of the subject as we do in the background of the rock, stairs, and leaves. The reason this doesn't work is because our eyes are naturally going to focus where there is more contrast.   The brightest, or lightest value, of this picture is the dress.  So our eyes are immediately drawn there.  It does nothing for the overall balance and composition and the focal point is uncertain.

A simpler background with less contrast would have created more focus on the portrait itself.  I've done this in the edit below.

Girl against rocks III.jpg


The same problem is happening in this photo:

small - pexels-photo-175701.jpg

The background in this shot is WAY too distracting.

Now that you’ve seen how this works in photography, you can apply the same concepts to your art.

My recommendation?

Don’t force the background.

If you can include a background that makes sense for your piece--one that is NOT distracting-- then go for it! Otherwise, just leave it out. Let the subject be the focal point no matter what!


***NOTE: All photos in this post are free to use commercially or personally without attribution.

Is There A Right Way To Draw?

I can answer this question quite emphatically:  No, there is not a “right” way to draw.  But I think there are some more effective ways to draw and I think there are some less effective ways to draw.  What do I mean by that?  Allow me to explain.

If you think about the mechanics of drawing then you’re probably visualizing a writing instrument, a paper and maybe a reference or at least an idea that is being executed, right?  Yep!  Those are the base requirements to get started.  But drawing is so much more than this.   

I hear artists, especially young artists, talk about how they like to just draw from their memory.  If you’re attempting to just get a quick sketch (concept) on paper then that’s a good way to do it.  But if, on the other hand, you want to develop a drawing that is dynamic and full of life, then I suggest putting more planning and thought into it.  Drawing from memory is not wrong, but it could be described as less effective.

Start with this checklist that you can walk through in your mind:

What are you wanting to convey?  Try to be as detailed in your response as possible.

Do you have a reference for your drawing?  If so, is it detailed enough for you to see what you need to see?  

What tools in particular are you going to use?  What about pencils, paper, size of paper and placement of the subject on the paper?  Are you going to allow a lot of negative space around your drawing or are you filling the paper entirely?  Are you going to draw a background or not?

Once that preliminary planning is done, there is a second part to getting started.   At this point you could dive in and probably be fine.  But ask yourself, is there anything about this process that involves something brand new?  Maybe you’re using different pencils or paper that you’ve not drawn on before.  If that’s the case then you will want to test on a separate page to determine what will happen so you can eliminate any surprises.  

Now you are making your first marks on the page.  You want to start with a light hand so that you can erase anything that you may want to alter later.  This is the reason I always start with a dark pencil or at least a middle tone color so that I can see what I’m drawing and so that it can provide a skeletal framework for me to work inside of.  

As I progress in the drawing process I am constantly refining my line drawing and I am erasing the line drawing where I may have made incorrect marks.  Specifically, I’m looking for incorrect proportions in a face, I’m looking for a form shadow that is too overbearing, and I’m looking for something in my drawing that is starting to draw too much attention.  When you’re just beginning you probably do not want to draw more than 15 or 20 minutes without taking a break.  Why?  Because you will grow mentally tired and may make a decision that is not in balance with the entire drawing and you may inadvertently create an eye-sore that you will have trouble removing later.  But after a 5 or 10 minute break your perspective will be fresh and your vision will be clearer.  Remember that drawing is more about seeing than it is drawing.

If you draw with a heavy hand at the beginning and you develop one area (like a neck for example in a portrait) and you’ve left the forehead alone, then you will need to remember exactly how you executed the neck.  It is so much easier to go ahead and do the layers all at the same time.  If you lay a base layer of “brown ochre” down in one area of your drawing, then just make sure you layer that color everywhere (of course the coverage will vary according to subject).  Once that is done, then move on to the next layer.  

What about the stroke?

The stroke that you use should be something where you are holding the pencil with a comfortable grip and with a motion that you can sustain for a long time without tiring.  You can also use a variety of strokes, but they should always be controlled and not strained.   The pencil should be able to rest comfortably in your hand to allow you to make the mark you intend to make.  You never want a situation where you are wondering where the tip of the pencil is going to end up connecting with the paper.  

Finally, once you make a mark please never think that you have to live with that mark.  If you don’t like the mark you just made then erase it and do it again.  You will get better at making marks and it will get easier to control.  But don’t make the mistake of waiting until an hour goes by, thinking in your mind, I’ll just correct those mistakes later.  Do it now.  Take care of it while you remember what you need to correct.

Is this the only way to approach a drawing? Absolutely not. But this is what I have found to be more effective time and time again.

Stay Sharp!

Ready to get started using colored pencil?  Download my getting started guide!